Just about anything and everything that I do is Holiday inspired...in one way or another. But this little collection of Friday Favorites is especially so. Halloween is near & dear to my heart...so close it is to my birthday, and it's also right in the middle of this glorious season so rich with color and romance. And being that this is the last Friday that I'll have before the magical and mystical All Hallows Eve, I figured I'd share the love.
To start with are these delicate doilies, framed and matted in black. Lovingly crocheted by the skilled hands of someone's Great Granny, I love their almost spider web like appearance.
This chocolate tuxedo pie with pecan crustwas double take worthy. Aaron was rushing around, looking for packing material or something, and as he was walking past me behind the couch, he could see my screen. I heard his feet screech to a halt on the wood floor and he reversed two steps to grab a second look. I have a long list of recipes that I "must make", but seriously, this one is a "must must make"! I'll be turning my kitchen into a black tie affair one of these Autumn evenings.
You know how much I adore old photos. They are way up at the top of my favorite collectibles list. And to narrow the list even further...old "Holiday" photos make me melt! Black & white shots of the family Christmas tree, oh jeez...the aluminum trees from the 1950's are to die for...kids and their Easter baskets, holding stuffed bunnies...and I especially love old Halloween photos like this , kids in their costumes, they often have a creepy quality and the creepiness wasn't on purpose. Like this was just two girls in their pretty dresses, showing off their homemade masks...but the sepia tone, the age of the pic, and that barnyard shack in this rural setting just creeps me out. I love it!
This photo made me laugh out loud. Seriously. I'm telling myself that the dog has a great sense of humor! Like he is fully aware of the joke. I'd like to imagine that he planned this out...his mom & dad entering the room to find him just like this...LOL!
They're made from real, antique tintype images. Again, the age of the images, and the careful cropping just make them creepy. All we see is a single hand...his and hers.I really could plan am entire outfit around these. I love the time worn brass and the black buttons. Perfect accessories for a Hallowe'en get together.
And at last, I LOVE these! I'm sure you can use them all year round, but to me they scream Halloween. A super simple diy craft. Take a pic of your house, or find an old pic, or take a pic of the spookiest house in town, even is you have to transform it into a spooky house...it could start out baby pink...all you have to do is print it out sepia toned! I just love how they glow. You can make a tiny village on a windowsill.
Ok, thanks again for stopping in to see my Friday Favorites. I wish you all a happy weekend!
Hi guys! I mentioned last week that we will be alternating our weekly Thursday classes between Art Journaling and other Mixed Media crafts. We'd love to do the Art Journaling every single week but we just have so so many other fun projects and at this point in time Thursday is our only free day. Hopefully, even you die hard Art Journalers will be just as psyched to tackle these other mixed media projects.You'll find that the supplies and tools used are nearly identical. This first one...our Faux Mini Doughnuts!...is a project that we've had on the back burner forever. They are super easy and super fun...and we've given the finished doughnuts as holiday gifts more than a few times.
We chose to do mini doughnuts simply because they are so adorbs...but you can make standard size just as well. We are big fans of faux sweets. Our home is full of faux cakes and cupcakes arranged on cake stands and under glass domes...we've been collecting them for years. At art events we often try to teach at least one class that focuses on faux sweets but we've never been able to do these particular doughnuts from start to finish at an event...this is due to the sculpting step, which takes 2-3 days to dry. But other than that, they're easy squeezy. This tutorial is for anyone who has the desire to make a sweet piece of almost-good-enough-to-eat artwork! Not even a smidge of crafting experience is required. Just bring your enthusiasm and your sweet tooth!
We've used a few different types of clay for this sort of project, but found that Air-Dry Clay by Crayola works perfect for these mini doughnuts!
For this step you will need:
Air Dry Clay
a glass of water
waxed paper
Working upon a surface of waxed paper we rolled uniform sized balls (a little bigger than golf balls...see above pic) after warming the clay up a bit in our hands.
Then we rolled each ball out into individual logs. (see above pic)
Next, join the ends of the logs, pinching and working together to form a ring.
Start smoothing your ring using your finger tips dipped in water.
Perfect your doughnut shape smoothing as you go with water.
Make as many as you'd like! Set them aside to dry for 2-3 days. Yes, we know, the 2-3 days feels like an eternity...but it'll be worth it.
After 3 days or so your doughnuts will be dry and a chalky white. That's really when you'll know that they're dry...the color changes from a creamy white to a white white.
Time to paint them! Pour out your "cake colors". We used chocolate brown, terra cotta, very pale butter yellow, and golden yellow. (and you'll see that we poured a tan khaki type color, but truth be told...we did not use it...so don't bother with the khaki tan.)
Base coat your doughnuts with very pale yellow. Paint one side, set down, let dry...flip and repeat. This is the process for painting classic doughnuts...but you can get creative here by all means. (You'll see in the pic that we did a couple other kinds of doughnuts...a chocolate chocolate...and that other one is pumpkin spice.)
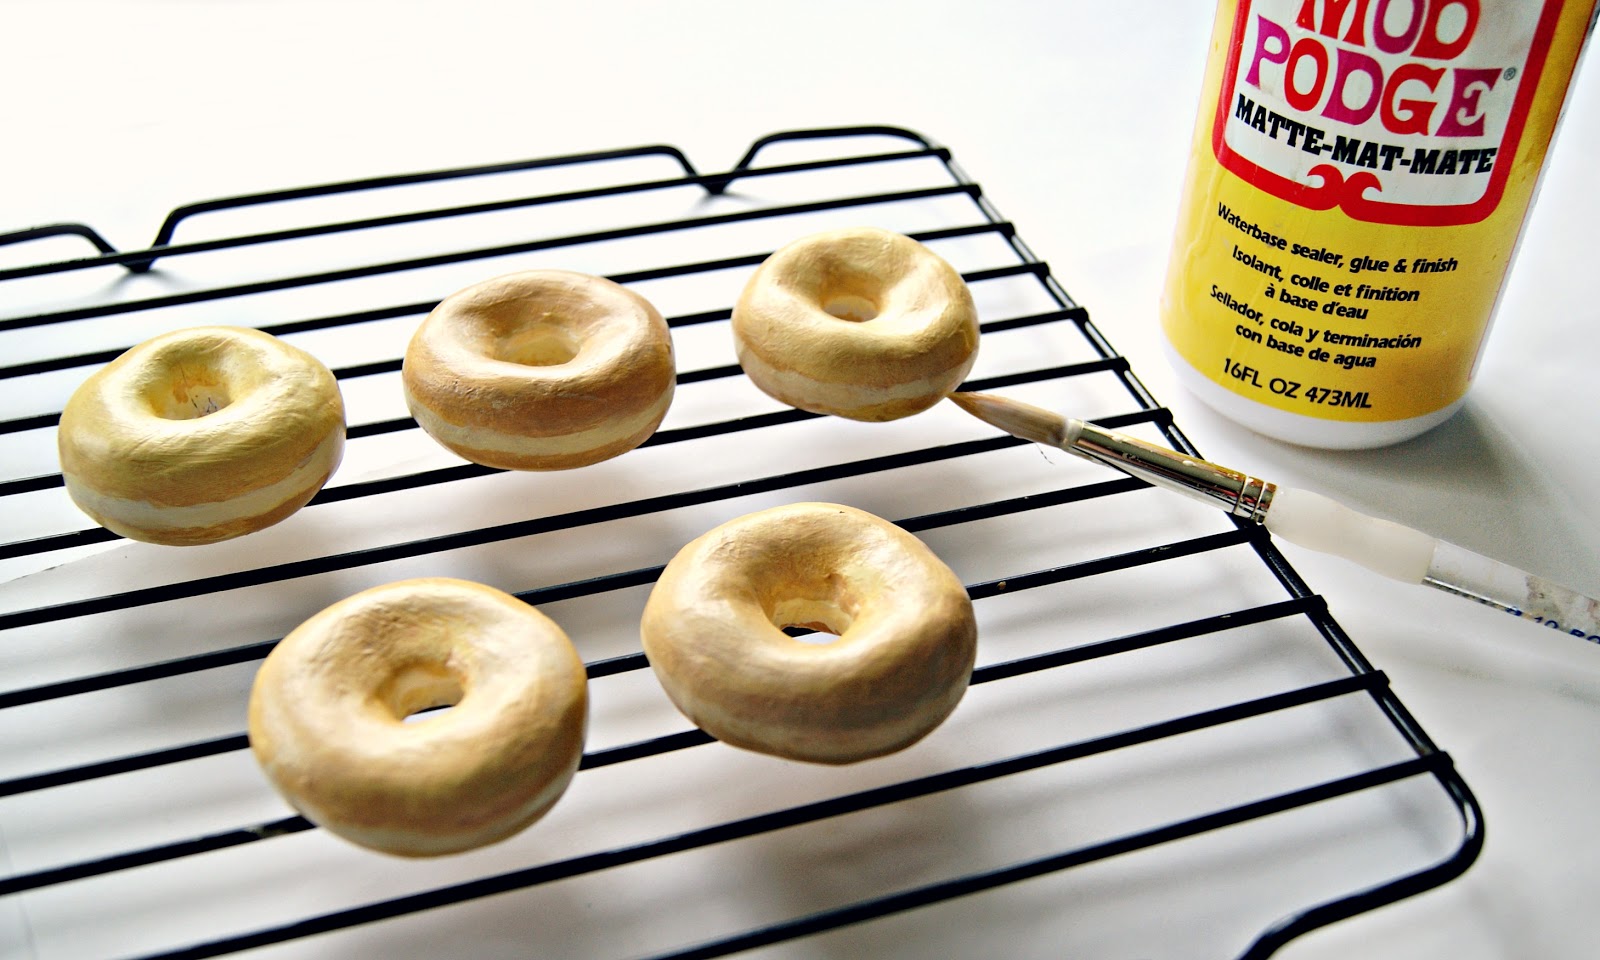
You can continue working upon the waxed paper but we happened to have a cooling rack handy. Let them dry ( you could blow dry them if you'd like to speed things up)
Next step in painting is to make them look "fried". You'll do this with a "fry wash".
Mix a wash using the terra cotta, the golden yellow, and a tiny touch of the chocolate brown. To make the wash just blend the colors on your palette until you get the desired tone and then continually dip your detail brush in water, adding the water to the paint on your palette until you get a semi transparent look to the paint.
Create a "fry line". You'll notice a light toned line that goes right down the middle of a doughnut. We call this the "fry line". It occurs in the cooking process. When they fry doughnuts they float them in hot oil. They fry one side and then flip...the light toned line is the portion that didn't get immersed in the oil, so it remained light. Having this line will give you that realistic doughnut look.
So, the "fry line" should just be the pale yellow from the base coat. Brush the "fry wash" on the top side of your doughnut and blot and dab with a paper towel (which you'll see in the step directly below this.) but when applying this wash and working it with the paper towel don't go all the way down the side of the doughnut...leave this area untouched by the wash...after you wash both top and bottom what remains will be the pale yellow "fry line."
Here's a pic of the wash being wiped and dabbed with a paper towel. Applying the fry wash is a simple process. In fact, the shape and texture of your clay doughnut will almost do the work for you. You're just brushing the wash onto your pale yellow doughnut and then dabbing it away. Again, leave a strip of pale yellow around the middle of the doughnut.
You should see a line. And it's not a problem at all if you get wash on this middle strip of doughnut...because what we always do is wait for the fry wash to dry and then we paint a strip of pale yellow around the middle as you can see in the pic above.
Let them dry ( again you could blow dry them)
Now seal them with a coat of matte finish Mod Podge.
Here comes the FUN part! Dipping them in "glaze"!
We made strawberry, vanilla, chocolate annnd pumpkin spice glazes.
Here is how:
heavy gloss gel medium by Golden
Liquitex gloss varnish
craft paint in desired color
Mixing up your glaze is not an exact science. Mix each in a shallow bowl...this will make it easier for you to dip your doughnut into the glaze.
Ok, the ratio is roughly this...it's mostly the Liquitex gloss varnish.
Then, thicken it up with the Heavy Gel (gloss) medium.
Then add paint until you've got enough color so that your glaze is opaque.
The consistency should be thick enough so that you can dip your doughnut in, then set down your doughnut and the glaze remains on top like a thick frosting. It doesn't just pour down the sides. (see pic below)
As you go along you can add more of the Liquitex if the glaze is too thick, or more gel medium if it's too thin. As you can see in the pic below, the glaze has a ridge line from being dipped, but as the doughnuts sit the glaze will settle.
Don't they look so so fun?
the glaze will settle just like the real thing!
We even made a pumpkin spice doughnut!
We recommend letting them dry for a day or so before displaying them, or "playing" with them.
We hope you enjoyed this tutorial! We think they'd make a really fun family project or rainy day craft with the kiddos! We'd LOVE to see yours! Please, by all means feel free to come back and link up in the comments! And let us know any tricks or tips or changes to the process that helped you along the way. We just love hearing about your own creative endeavors...so please please share all the deets!
Today's weather was pretty much near perfect for Fall...chilly yet sunny. We had a few windows open, as well as both the front door and the kitchen door. We were a household busy with projects. Out front Walt was stripping down, sanding, and priming his jeep. Then Aaron came home with these two great pieces from a woman around the corner who's house is under renovation. She said she was still emotionally attached to both of them but couldn't make them work in her new home layout.
When Aaron told her that he had some fab re-do ideas for them she was much happier to see that they'd be getting new lives. Aaron and myself worked almost exclusively on furniture for many years...painting literally hundreds of pieces. The two of us in our work van trekking all over New Jersey and New York, picking up bedroom sets etc... so that we could work our custom magic on them. In meeting with our clients we've been in more homes and shops than we could ever remember.
As soon as Aaron saw this cupboard which happens to be a super bright pink (too peachy for me)...he knew we could make it work in our soon to be rearranged home. Being that we work from home we are always in need of storage. It could work in the studio or kitchen or livingroom. The woman used it in her laundry room and pointed out the detergent stains on the shelves.
I was itching to get right to sanding and priming it today. I'm not sure which room it will go in...I'm leaning toward studio or kitchen. I have a few ideas for it but it will have to wait till we get the kitchen and studio painted. And then you can bet it will probably be tackled in a single day! And worry not...I promise there'll be a full tutorial of the makeover.
And the second find that Aaron carried home, (this one a whole lot heavier due to the mirror!) is this really cool door with big mirror panels. It's definitely getting painted...not sure what color...and not sure which room we'd use it in...but it could be an awesome addition to our decor.
We have a pretty long list of projects to check off and we are really excited about all of them. Big ones and little ones alike.
So...I just thought I'd drop a line to let you guys in on our project driven Sunday. After cleaning up we topped the night off with a pizza, some chocolate, and The Walking Dead! Not a bad Sunday at all.
It's that time of year again...my Birthday has rolled around again...and whadaya know...I'm 25 AGAIN!
And to celebrate this mathematical miracle we're throwing a big 25% off sale! (my real birthday is on the 22nd but we're starting a couple days early.) This is a great time to grab anything you might've had your eye on for a while...maybe one of our bigger signs or diecuts...ya know...an item where the discount will add up. Heck, I'm willing to share my birthday...shop for yourself...you deserve a gift. haha!
But seriously, a sale is sale...but when putting this together it's really you guys that we have in mind. You have no idea how much we appreciate your support...your pats on the back...your words of encouragement. We live to create and create to live...and without you guys none of it would be possible. Thank you so much for sharing another year with me. I look forward to many many more! Love ya to bits!
Happy Friday to you all! Wow, this is maybe the latest ever that I've posted my Friday Favorites. It was a busy day...had to ship a bunch of packages, get organized, clean up the studio, and then start all over again to get stuff prepped for shipping on Monday. No matter what...if you work in an office or work for yourself...one thing is certain...you cannot escape the grind. But that's life...and I'm not necessarily complaining. Truth be told...you should be happy to even have a grind. In today's world the grind is a gift. And in thinking of the day-in, day-out worker bee existence that we all are required to have, it got me thinking about what these Friday Favorites actually mean to me...and how I'd like for that meaning to be passed on to all of you guys. Well, for starters, they indicate the end of the work week for most of us...and that in itself is a reason to rejoice! But for me they also are illustrations of why we suffer the grind. These are the types of things that we all work for. Some of them are things that you shop for with your hard earned paycheck...but a lot of my Friday Faves don't have a price tag...they simply require your time. And that's a big reason why we work...to buy ourselves some TIME. Some time to do wonderful things and bake amazing things like the Lemon Almond Tortaabove. I see the way my beloved little brother Walter handles his grind. He'll get home from a very long and arduous workday and upon hopping out of the work van he won't even make a pit stop into our house...he'll head right into his workshop and work for hours on rebuilding an engine or polishing some chrome. Some would say that he's nuts...but I totally get it. The work he does in his workshop is his passion. And the hard day that preceded it is how earned the time to undertake his passion. So once again...a big Happy Friday to all of you! You earned it. I hope these Friday Favorites remind you of all the reasons why you work as hard as you do.
Get a load of this DIY Stump Table... I absolutely love this! Seeing this come together from start to finish had me grinning from ear to ear. I came across it on Pinterest and I'm so happy that it led me to this duo's blog. They go by 17 apart, which happens to be their age difference, and they've got so so many super fab tutorials like this one.
I have always been head over heels (pun intended!) for leopard print! I incorporate leopard print into my wardrobe as a neutral. In my opinion, it goes with everything. For real, going back more than 15 years it's been a mainstay in my look. So when I came across these Leopard L'amour Wedges which I found on the brand new and ohhh so fabulous Hello Holiday I just knew that I found my newest fashion destination.
And as if the wedges weren't enough Hello Holiday had to go and dazzle me with this: TheEarl Grey Coat ! Oh wow...it is so so me! The cut, the lines, the length, the scallop...perfect for this wonderful season.
And what better way to finish off my Friday Faves than with a necklace?! The right necklace can take a look from blah to beautiful. And I think this one has what it takes. It is from Saints & Sinners by Barbe Saint John. I love everything about it...kinda looks like a wearable Art Journal.
Ok, hope you enjoyed these Friday Favorites! All apologies for how late they posted. I wish you all a fun filled, inspiring weekend. xo Jenny
We were feeling some seasonal spirit and decided to put together a Day of the Dead inspired page. We're thrilled to have come so far with all of you...now in week 11 of Art Journaling with Jenny & Aaron. We're excited to do a page that incorporates more Art than Journaling...and we hope that you can apply these skills to your own artwork. Hopefully you are now more comfortable with a paint brush and with drawing some details and hand lettering. We have so much fun working in mixed media. Drawing on the inspiration from a photo clipped out of a magazine...and patterned papers and trims and fabrics and stencils. The supplies alone will take care of half of the challenge...it's your job to have the eye for gathering good stuff and assembling it all in an artful way.
As with last week's class, we made a video slide show. Of course on it's own it only gives an idea of each step, so we included full detailed instructions for you to follow along. In the upper left corner of each photo in the slide show you'll see a title. In the instructions we've titled each step with those same titles so that you'll have an image to match each step. You can view the video once, or twice, or more...pause where you'd like, rewind, fast forward...watch it here on the blog, full screen, or on youtube.
Mixed Media is the name of the game, and the subject this week is a Day of the Dead inspired page. Start with the photograph of your choosing. One that gives you plenty of space for adorning with a fab hand painted makeup job. It was purely coincidence that we chose Lady Gaga...and that she did a video wearing makeup just like this. This is also a week for using lots of bright colors. That's what we love about Day of the Dead as opposed to Halloween...the bright colors! So find your face, get out your detail brushes, your sharpie pen, and definitely try to incorporate some flowers...maybe even some three dimensional flowers would be fab. This is one subject that we just can't wait to see in all of your journals...we think you guys will have so much fun with this!
back your photo with watercolor paper. Cut out a photo from a magazine. The one we clipped from the magazine was a bit small for our page so we enlarged it on our copier. Then, using decoupage medium we adhered it to a piece of watercolor paper to bolster it a bit.
pour some paint. For our background of varying pinks we just poured various shades of pink right onto the page.
blend. Then with a 3/4 inch brush just blend the paint until your page is coated and you have a varied look.
grab your mist. We want pink as our backdrop and for the stencil pattern we'll be spraying opaque white.
lay your stencil. Lay your stencil over the entire page or just over the area that you are misting.
mist. Spray your color from about 8 inches away. It's up to you if you want an even coat or a varied look.
lift stencil, let dry. When done misting then carefully remove your stencil and let your page fully dry.
adhere papers. Tear pieces of contrasting papers, apply medium, lay down pieces and smooth out any air bubbles or wrinkles. Let dry fully and then apply a topcoat to your entire page. We used clear matte gel medium. Again, let fully dry before the next step.
gesso wash. Once dry we then applied a gesso wash to mute the background a bit. Just mix a bit of water with gesso right on your palette and then apply to your page with a paint brush until you get the look you desire. Let dry.
add some paint. We then brushed on some paint in some areas just for extra texture and color.
distress edges with paint. Simply rub paint on the edges of your pages. We call it distressing because it's similar to distressed edges of painted furniture. Only on furniture, the paint is rubbed off...but here, we're rubbing paint on. Use a paint brush or even your finger.
dry brush. The dry brush technique is done by taking a dry paintbrush and lightly dipping it in some paint and then just stroking the page to add swatches of color. We wanted to add pops of aqua over our text patterned paper.
speckle. To speckle, just water down a little paint, dip your brush in the wash and then hold your brush about six inches above your page and tap the end of the brush right below the bristles, the metal part of the brush. There is no perfect way to speckle. It's haphazard and should be fun.
speckle some more. It's always good to speckle with multiple colors.
pour some paint. Now, put the paint on your palette that you'll be using to detail your face. In our case: white, black, aqua, dark pink, light pink, and yellow.
base coat white. To start your skull face first base coat it white but be sure to keep the eyes, mouth and nostrils.
let dry. You may need two coats to get it opaque white. When done, let it fully dry.
sketch shapes. Now, with a pencil sketch out the shapes of the skull's eye sockets and the nose holes. The nose is sorta like an upside down heart with a split down the middle.
paint in black. Now, carefully paint in your eye sockets and nose holes black. Paint right up to the edge of the eyes, leaving a little rim around the eyes the same way you would if you were applying makeup to your face.
add some more color and pattern. It's time for the fun decorative details. Use whatever colors work for your design. We went with a pretty straight forward sugar skull design...dots and swirly scrolls.
cut out flowers. For her floral head dress we'll be using flowers that we cut from this fab patterned paper. Cut out as many big flowers as you can get out of a page.
adhere flowers. Some of the flowers will be peaking out from behind her head, so first position the head on the page just to figure out where it will be and then remove and adhere flowers to the page so that they'll be peaking out from behind once you adhere the head.
adhere face and flowers. Adhere the head using decoupage medium, since it's backed with watercolor paper it will be a bit more challenging to get it glued down...just press very firmly. Then arrange flowers until you are happy with her head dress and adhere each individual flower.
add a "shirt". We cut a strip of leopard print paper in the shape of shoulders then adhered it to the page over the base of the neck.
add wash to edges. To make the head stand out against the background we applied a wash around the head. A little bit of dark brown paint and water applied with a paint brush. Do a small area at a time.
blot & dab. Blot and dab each small area until you get desired look.
do some lettering. We wrote Day of The Dead in Spanish on some watercolor paper with a sharpie pen.
adhere words. We then cut out the words and adhered them to the page with decoupage medium.
add some details with sharpie pen. The face needed some extra little details...perfect for the sharpie pen...some mouth stitching and little dots.
outline flowers. We thought the flowers blended into the background too much so we outlined each petal with a sharpie pen...we love the result.
add some lace trim. The lace trim, applied with a glue strip, softens the look, adds texture, and a nice pop of color as well.
apply glue to centers of flowers. Glitter makes everything better. Just apply medium to the centers of your flowers with a small brush.
sprinkle glitter. Then sprinkle with glitter while the medium is still wet.
love the sparkle. We did some with dark pink and some with gold...they look so shimmery and good!
looking good. Take a look over your page and think about what you may want to add as finishing touches.
Fabulous! We absolutely love this Day of The Dead inspired page...it started with a simple picture from a magazine.
Thanks so so much for joining us again! This one was really fun for us. Please grab our button above to share on your blog and facebook...and be sure to share a link of your Art Journaling in the comments. We can't wait to see your Day of the Dead inspired creations! Next Thursday we'll be bringing you a tutorial instead of the nornally scheduled Art Journaling. Our schedule has gotten so so full and we found that Thursdays are our only free day...so we have to alternate weeks. We promise that you will love next week's mixed media tutorial...it is so so much fun! So see you next week!
It's so chilly this weekend...coldest yet of the season. We finally caved and had to turn on the heat. It's funny how the dogs instantly change their behaviors due to the cold. Normally Carlos is our shadow...from the second we wake up it seems like he is under foot. But more than a few times this weekend he opted to curl up under blankets instead...and "little" remained in his bed which sits on the floor just in front of the nightstand.
All I can think about is moving upstairs now. It can't happen fast enough. I cannot wait to have a larger bedroom. I've been dreaming and pinning. I decided to go with a new look and color palette. As much as I love the aqua and sepia that we've had in the past two bedrooms...I'm really into grey right now. I think it will be soothing and sleep inducing, like on rainy days when you don't want to get out of bed.
I took part of Saturday afternoon to empty the master bedroom and sweep it out. The carpet got pulled out months ago and what remains is some old faux wood grain linoleum. I'd love to do wood flooring but it isn't in the budget right now. I considered painting the linoleum but I think we're gonna do carpet. We've always had wood floors in our bedroom since our very first apartment but when we moved into this house we had to quickly make our temporary room comfy. So we went with some carpet tiles, which were really really easy and affordable...and it turns out that the pups loved it! It's the only room with carpeting. The carpet tiles aren't super fabulous but we finished the room in a weekend. So I think we're gonna give the pups what they want and I've been looking at some carpet tile options for our new bedroom.
I'm planning some kitchen make over projects and pulled out some of my favorite vintage baking books for inspiration. I just love the kooky illustrations in the 60's books. Though I'm more of a 40's - 50's gal. As much as I'd love to dive right in on the kitchen, it looks like the bedroom is first up. And then we'll be making our old bedroom into our studio. It's easy for me to get overwhelmed and a bit anxious when I think about how much we need to do all while running our business and while taking care of daily life stuff. It's all about making lists and checking things off. So...first and second on the list are carpet tiles and paint for the new bedroom.
If you follow our weekly Art Journaling class you know that I adore vintage photos. My "Instant Ancestors". I have tins and boxes full of them. Along with old handwritten letters, and greeting cards, and postcards. I was digging through them today and planning some projects.
And speaking of projects...ohh my gosh I am soo excited about a super fun tutorial we'll be sharing very soon. I just had to share this little sneak peek. :)
And as many of you may already know...it's the BIG day!! The Walking Dead is back tonight! Hooooray! I am so so excited! Will you be watching? Have you been waiting for any shows to come back?
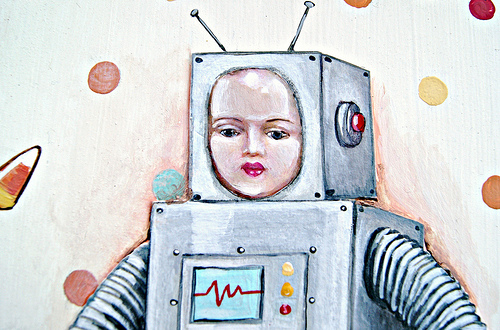
Hi guys! I just had to pop in and share this One of a Kind piece we did for this month's Spookytime Jingles update! We knew that we wanted to go a bit beyond the typical orange and black, witches, and ghosts, and we both agreed that we should paint a robot!
The absolute classic kids costume...tried and true...never fails to elicit smiles across the board. A robot straight out of "The Future"... engineered using cutting edge technology! That is...if you consider cardboard boxes coated with silver spray paint "cutting edge"... haha! This painting also holds a special place in our hearts...we once dressed as cardboard box robots for our best friend's Halloween wedding. (needless to say...we won first prize! haha!)
Well, we just had to pay tribute to one of our fave Halloween costumes of all time. This is totally hand painted and we added some dimension to the piece by first painting the little robot on watercolor paper, then we cut it out and adhered it to the board which we hand painted with festive polka dots and candy corns.
This is a One of a Kind original 100% hand painted mixed media creation. This 8 x 10 wooden plaque comes signed, dated, and ready to hang.
$105.00 includes FREE shipping in the USA!
If you'd like to add this special piece to your Halloween decor just shoot us an email.
And be sure to visit SpookyTime Jingles to see lots more OOAK art by some amazing artists!
merry christmas and happy new year, merry christmas and happy new year mp3, merry christmas and happy new year song, merry christmas and happy new year song lyrics, merry christmas and happy new years, merry christmas and happy new year 2016, merry christmas and happy new year song mp3 free download, merry christmas and happy new year vector, merry christmas and happy new year wishes, merry christmas and happy new year 2014, merry christmas and happy new year in spanish, merry christmas and happy new year messages, merry christmas and happy new year in german, merry christmas and happy new year 2013, merry christmas and happy new year in french, merry christmas and happy new year greetings, merry christmas and happy new year quotes, merry christmas and happy new year wishes message, merry christmas and happy new year in italian, merry christmas and happy new year cards, merry christmas and happy new year lyrics, merry christmas and happy new year animated gif, merry christmas and happy new year animation, merry christmas and happy new year animated, merry christmas and happy new year all languages, merry christmas and happy new year arabic, merry christmas and happy new year animated cards, merry christmas and happy new year abba, merry christmas and happy new year auf deutsch, merry christmas and happy new year animations, merry christmas and happy new year all the best, merry christmas and happy new year accordi, merry christmas and happy new year ascii art, merry christmas and happy new year as gaeilge, merry christmas and happy new year akordy, merry christmas and happy new year afrikaans, clipart merry christmas happy new year, merry christmas and happy new year you filthy animal, jimi hendrix merry christmas and happy new year album, merry christmas and happy new year wishing you a, merry christmas and a happy new year lyrics, merry christmas and happy new year beer, merry christmas and happy new year banner, merry christmas and happy new year business wishes, merry christmas and happy new year business greetings, merry christmas and happy new year background, merry christmas and happy new year by celine dion, merry christmas and happy new year boney m, merry christmas and happy new year best wishes, merry christmas and happy new year beatles, merry christmas and happy new year business letter, merry christmas and happy new year blessing, merry christmas and happy new year beat, merry christmas and happy new year business, merry christmas and happy new year business congratulations, merry christmas and happy new year bao an, merry christmas and happy new year brazilian portuguese, merry christmas and happy new year backgrounds, merry christmas and happy new year business message, merry christmas and happy new year boss, merry christmas and happy new year by joanna fuchs, merry christmas and happy new year download, merry christmas and happy new year download mp3
merry christmas and happy new year dutch, merry christmas and happy new year deutsch, merry christmas and happy new year song download, merry christmas and happy new year celine dion, merry christmas and happy new year celine dion lyrics, merry christmas and happy new year in dutch language, merry christmas and happy new year cards free download, merry christmas and happy new year song free download, merry christmas and happy new year 2014 cards free download, download we wish you a merry christmas and happy new year song, merry christmas and happy new year dj, merry christmas and happy new year design, merry christmas and happy new year different languages, merry christmas and happy new year dance, merry christmas and happy new year dear, merry christmas and happy new year songs download, merry christmas and happy new year email sample, merry christmas and happy new year email, merry christmas and happy new year ecard, merry christmas and happy new year ecards free, merry christmas and happy new year ecard free, merry christmas and happy new year english, merry christmas and happy new year everybody, merry christmas and happy new year emoticon, ecard merry christmas and happy new year 2013, ecard merry christmas and happy new year 2014, merry christmas and happy new year ecards, merry christmas and happy new year everyone, merry christmas and happy new year email messages, merry christmas and happy new year email signature, merry christmas and happy new year en francais, merry christmas and happy new year estonian, merry christmas and happy new year 2013 ecards, merry christmas and happy new year greetings examples, merry christmas and happy new year greetings ecards, merry christmas and happy new year 2014 ecards, merry christmas and happy new year french, merry christmas and happy new year font, merry christmas and happy new year free ecards, merry christmas and happy new year free vector, merry christmas and happy new year facebook, merry christmas and happy new year from, merry christmas and happy new year formal wishes, merry christmas and happy new year free card, merry christmas and happy new year for you too, merry christmas and happy new year foto, merry christmas and happy new year free ecard, merry christmas and happy new year free images, merry christmas and happy new year from our family to yours, merry christmas and happy new year free clip art, merry christmas and happy new year facebook cover photo, merry christmas and happy new year facebook cover, merry christmas and happy new year funny animation, merry christmas and happy new year for everyone, merry christmas and happy new year funny, merry christmas and happy new year french translation, merry christmas and happy new year greeting, merry christmas and happy new year greeting card, merry christmas and happy new year greeting words, merry christmas and happy new year gif, merry christmas and happy new year german, merry christmas and happy new year greetings for business partners, merry christmas and happy new year greeting cards, merry christmas and happy new year greetings cards, merry christmas and happy new year greetings message, merry christmas and happy new year greetings quotes, merry christmas and happy new year greetings sayings, merry christmas and happy new year greeting messages, merry christmas and happy new year games, merry christmas and happy new year greeting cards 2013, merry christmas and happy new year greetings to colleagues, merry christmas and happy new year greetings messages, merry christmas and happy new year greetings text, merry christmas and happy new year graphics, merry christmas and happy new year greek